SharePoint Integration
SharePoint Integration connects Microsoft SharePoint sites/libraries to xMagic Drive, so your documents stay searchable and up to date without manual uploads.
Overview
When you connect SharePoint, xMagic will:
- Pull files from selected SharePoint sites and document libraries
- Index files so agents/subagents can retrieve and use them in responses
- Keep Drive synchronized with source changes (when sync is enabled)
This gives you a living knowledge layer powered by your existing SharePoint content.
Adding the SharePoint integration
- Open Drive in xMagic
- Create a new folder (or open an existing folder)
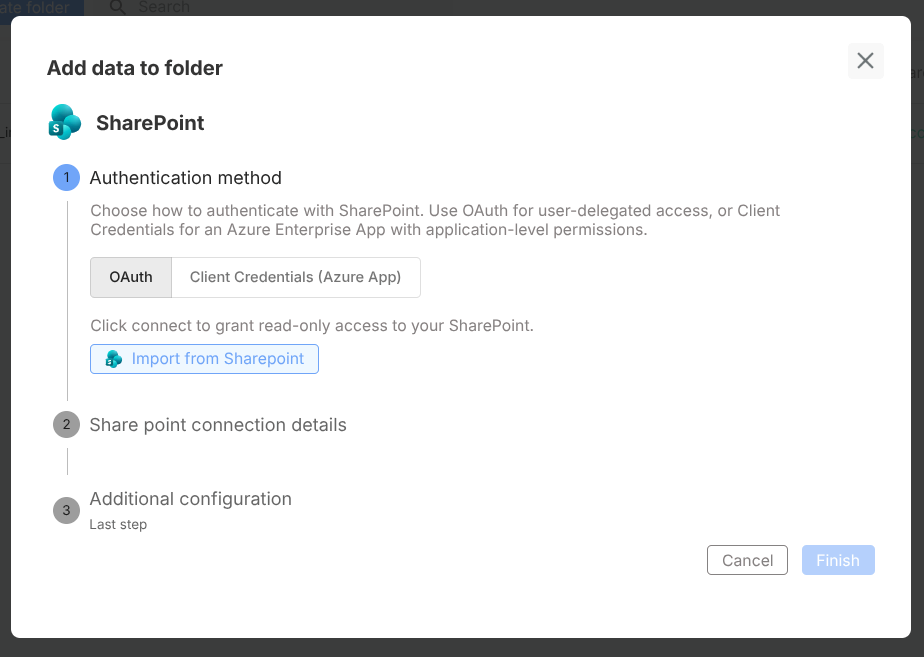
- Click Add data → SharePoint
- Sign in with Microsoft (OAuth)
- Select sites/libraries to connect
- Confirm and start sync
Sync behavior
With sync enabled, xMagic periodically checks SharePoint and mirrors changes in Drive.
| SharePoint event | xMagic action |
|---|---|
| New file added | File is imported and indexed |
| File updated | Existing entry is re-indexed |
| File removed | Entry is removed from Drive |
This ensures your Drive folder reflects the latest SharePoint state.
Authentication methods
SharePoint supports two authentication approaches:
1) OAuth (recommended)
Best for most teams. No custom app registration is required on the customer side.
Requested delegated permissions:
| Permission | Type | Description |
|---|---|---|
Files.Read | Delegated | Read signed-in user files |
offline_access | Delegated | Keep access via refresh token |
User.Read | Delegated | Sign in/read user profile |
These are low-privilege delegated permissions and typically do not require admin consent by default.
2) Client Credentials (Azure App Registration)
Best for organization-managed setups and service-to-service sync without depending on a specific user session.
You provide:
- Tenant ID
- Client ID
- Client Secret
This method uses Application permissions (not Delegated).
Troubleshooting: “Need admin approval”
You may see a Microsoft prompt saying admin approval is required.
Why it happens
In most cases, this is caused by Microsoft Entra tenant consent policy, not by unusually broad xMagic permission requests.
Resolution options
Option A: Admin grants org-wide consent from the prompt
- An Entra admin signs in from the consent screen
- Reviews requested permissions
- Selects consent on behalf of the organization
Option B: Admin pre-approves app in Entra ID
- Azure Portal → Microsoft Entra ID → Enterprise applications
- Open the xMagic SharePoint application
- Permissions → Grant admin consent
Option C: Update tenant consent policy
If allowed by your security policy, admins can enable user consent for low-risk verified apps.
Changing tenant-wide consent policy affects all applications, not only xMagic. Coordinate with IT/security before applying policy-wide changes.
Azure app registration setup (Client Credentials only)
Use this section only if your organization chooses Client Credentials.
Step 1: Create app registration
- Azure Portal → Microsoft Entra ID → App registrations
- Click New registration
- Configure:
- Name: e.g.,
xMagic - SharePoint - Supported account type: Single tenant
- Redirect URI: not required for Client Credentials
- Name: e.g.,
- Register app
- Copy Application (client) ID and Directory (tenant) ID
Step 2: Create client secret
- Open Certificates & secrets
- Create New client secret
- Copy secret value immediately (won’t be shown again)
Step 3: Configure Graph API permissions
- Go to API permissions → Add a permission → Microsoft Graph
- Select Application permissions
- Choose one model:
Option A: Sites.Read.All (broad access)
- Reads all SharePoint site collections in the tenant
- Fastest setup
- Requires admin consent
Option B: Sites.Selected (least-privilege)
- Access only to explicitly granted sites
- More secure, more setup work
- Requires admin consent + per-site grant
Example PowerShell flow for site-specific grant:
Import-Module Microsoft.Graph.Sites

$params = @{
  roles = @("read")
  grantedToIdentities = @(
    @{
      application = @{
        id = "<your-app-client-id>"
        displayName = "xMagic - SharePoint"
      }
    }
  )
}

New-MgSitePermission -SiteId "<your-site-id>" -BodyParameter $params
If you use Sites.Selected, you must grant access for each SharePoint site you want xMagic to read.
Example usage
Use case: Compliance assistant
- Connect SharePoint compliance libraries to Drive
- Attach that Drive folder to a compliance Subagent
- Ask policy questions in Interact
- Receive answers grounded in synced SharePoint documents
Best practices
- Start with OAuth unless your IT policy requires app credentials
- Use least privilege (
Sites.Selected) in regulated environments - Organize SharePoint libraries by domain before syncing
- Validate retrieval quality after first sync with representative user questions
- Review access and consent settings periodically with your IT team