Quick Start Guide to xMagic
Experience the benefits of personalized AI with xMagic. You can design chatbots based on your knowledge to meet your customer's needs. xMagic comes with many user-friendly features that improve its performance, making sales and support tasks smoother.
Why choose xMagic?
- Quality: Utilizing cutting-edge algorithms, xMagic crafts chatbots that understand and respond with unmatched precision.
- Simplicity: With an intuitive design, even the most complex tasks are made straightforward, letting you focus on content.
- Affordability: Experience top-tier chatbot capabilities without stretching your budget.
Chat with the Smartest AI
Train your xMagic bot to interpret and address customer requests seamlessly, turning queries into meaningful dialogues. With xMagic, it's not just a conversation; it's an experience. Dive in and redefine customer engagement.
Welcome to xMagic
This guide walks you through the key components of the xMagic platform, helping you get up and running with your AI agent configuration, tools, and knowledge base.
Logging In
Access the platform at xMagic Login. You can sign in using:
- xMagic credentials
- Google or Microsoft account
Workspace overview
Workspace is where you manage your agents, tools, and knowledge shared across your team. You have fine grained control over who can access what, ensuring data security and collaboration efficiency.
Your Agents Panel (Left Sidebar)
The sidebar on the left contains a list of your agents. Each agent entry expands into five subsections:
- Interact – Talk to the deployed version of this agent. This is where you can test and experience the agent as your users would. Great for production checks.
- Threads – Every conversation with your agent is stored here for review. See user inputs, agent responses, and more.
- Artifacts – Every file output generated by the agent (such as PDFs, CSVs, or reports) is stored here for easy access.
- Knowledge – The agent-specific knowledge showing all attached data sources.
- Studio – The control room for configuring this agent’s settings, jobs, tools, and shortcuts.
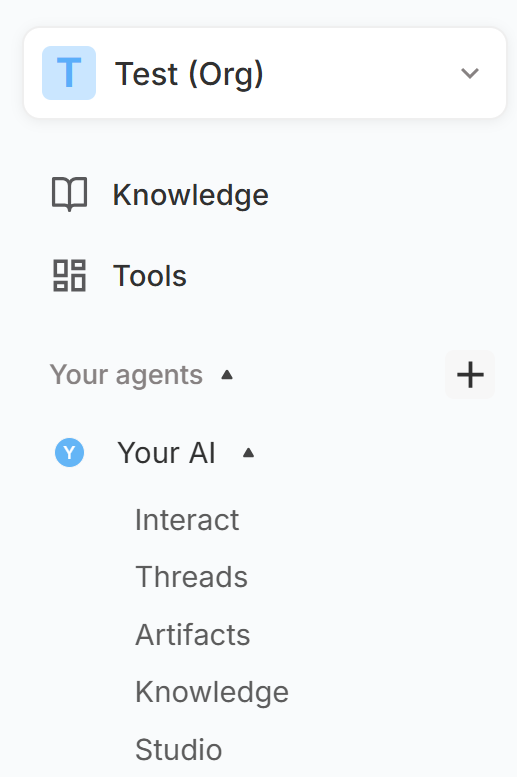
Additionally, two global sections are available in the sidebar:
- Knowledge: A global repository containing knowledge you have access to.
- Tools & MCP: A place to manage your own custom tools built via MCP servers.
You can create a new agent from the left sidebar under Your Agents by clicking the plus icon or from the Create Agent page.
Create your first agent
Creating your first agent is very simple. You can start with a blank slate or choose from one of our pre-built templates designed for common use cases. Each template comes with recommended settings, jobs, and tools to help you get started quickly. Lets create a new agent using the "AI Receptionist" template:
- On Create Agent page, select the "AI Receptionist" template.
- Fill in the required fields for the template, such as 'Name of your product or service', any relevant documents and more. You can always edit these later in Studio.
- Click "Create Agent" and you will be taken directly to Agent's Interact page where you can start chatting with your new agent right away.
- To customize your agent's behavior, head over to the Studio tab where you can adjust settings, attach jobs and tools, and manage shortcuts. (A detailed walkthrough of Studio is already available in the docs).
Tools
xMagic provides a set of built-in tools to accelerate common use cases. These can be attached to jobs during agent configuration.
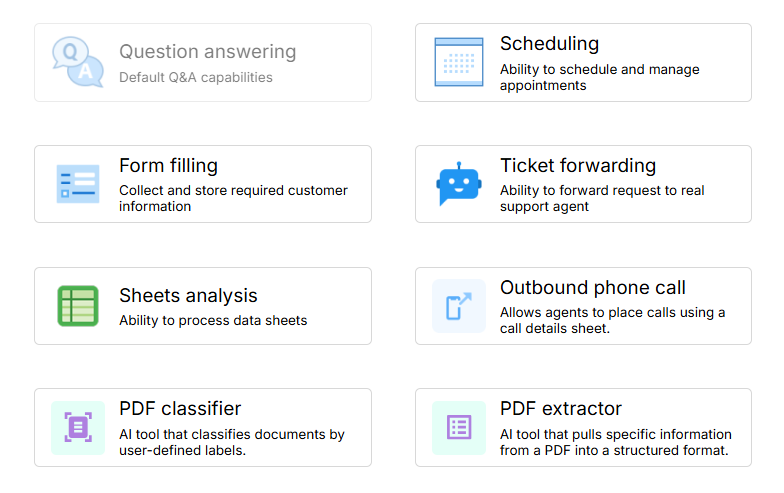
- Question Answering – Default Q&A capabilities
- Scheduling – Ability to manage and schedule appointments
- Form Filling – Collect and store structured customer input
- Ticket Forwarding – Route tickets to live agents for support
- Sheets Analysis – Process and analyze spreadsheets
- Outbound Phone Call – Lets agents place calls using a call details sheet
- PDF Classifier – AI tool that classifies documents by user-defined labels
- PDF Extractor – AI tool that extracts specific information from PDFs into structured formats
Global Settings (Top-Left Panel)
Click on your workspace icon in the top-left corner to access:
- Account – Personal details & your account settings
- Change Password – Update login credentials
- API Keys – Generate and manage API keys for programmatic access (linked to your account)
- Workspace – Workspace details and settings
- Members – Manage team members and their access levels
- Privileges – Set permissions for different roles within the workspace
- Billing – View subscription details and all plans
- Usage - Monitor your platform usage and limits
Getting Started Checklist
- ✅ Log in to your xMagic account
- ✅ Navigate to the Agents panel and create or open an agent
- ✅ Use Studio to configure your agent
- ✅ Attach jobs and relevant tools
- ✅ Add documents to your agent's Knowledge section
- ✅ Interact with your deployed agent under the 'Interact' tab
- ✅ Explore and manage global 'Knowledge' and 'Tools & MCP' sections
- ✅ Review outputs from the 'Artifacts' section
- ✅ Review user conversations in the 'Threads' section
Need help? Head to Contact Support.